Thursday, November 15, 2012

maple leaf crowns


Autumn has brought with it the amazing hues of this season and, here in Portland, the maple trees offer up the most extraordinary palette of technicolor leaves.  Every day when I pick Naiya up from school, the teachers seem to have made some child or other one of these beautiful crowns.  Hers came a few days ago just when I had collected leaves to put together a little how-to to share with all of you.  Aren't they gorgeous?  They're a little bit like the daisy chains of Summer in that they require no special tools or materials other than that of which they are made.


Simply break off the stems from the fallen leaves and overlap a third of one with about a third of another.

Carefully thread the stem through to sort of staple the two leaves together.


Lay an additional leaf and thread another stem...

Then another...


...until the band fits your child's head. 

Connect the final leaf to the first (with the stems either hidden inside or displayed out) and let your Autumn Princess or Prince enjoy her/his seasonal coronet.

Thursday, November 8, 2012

apple stamped capes for martinmas

A few years ago, when Naiya was still in preschool, the children and their teachers at her Waldorf school made these sweet capes for our Martinmas Lantern Walk.  We still have ours and take it out every year when we take our walk through the neighborhood on November 11th.  They're of such a simple design and young ones love the apple painting portion of this creation so I thought I'd share them as a Martinmas family craft.

They're made out of a single piece of wool felt and some felted yarn for the braided tie.  For our four year old the fabric measured 32" x 36" and this size still works for her at six.  Our finger knitted draw string measures about 36" as well.


Begin by laying out the flat fabric.  Using apples cut in half on their "equator" (which, in all apples, reveals a magical star), dip the open side in red paint and stamp the fabric at random intervals.


After allowing the paint to dry, fold the fabric in half with the stamps on the inside and sew across one of the short ends with a broad running stitch.  This creates the hood of the cape.


Measure about 12" down from the seam just created and cut three holes in a line in from the outside edge.  The first is only 1/2 an inch from the edge and the other two are about 3/4 inches apart.  Repeat on the other side.  These are holes for the drawstring.


Fold the fabric to align all three holes.  Using a thick braided or finger knitted yarn (about 36" long), run the drawstring from one side to the other.


Maintain the fold up to the top where the seam was sewn and place a few stitches at the peak to create a folded edge around the entire hood.


With needle and thread, stitch the drawstring at the center back.  Since we used wool felt, there was no reason to hem any edges.

It's made a warm and festive wrap for our evening Lantern Walk three years running.


Father Sun, Father Sun, will you lend me pray
A little flaming lantern to light me on my way?
The fairie folk have vanished from the meadow and the glen
And we would fain go seeking till we find them once again
Oh, lend me now a lantern that I may bear a light
To find the hidden pathway in the darkness of the night

Saturday, October 27, 2012

the magic of salt in watercolor

I recently came across this beautiful watercolor painting over at Simple Art Project Ideas.


It looks really incredible I think (as though great talent and skill are involved), but it turns out a child can make it!  These are the first tries of my six year old and I which we finished in about half an hour (plus drying time).


The painting is done on a piece of heavy watercolor paper with the edges, tree shapes and moon blocked out with painter's tape.  The crisp borders go on as wide as one would like while the tree trunks and branches use torn tape to give their edges a more natural look.  After the tape is smoothed down, the whole thing is painted and sprinkled with salt.  Yup, salt!  Who'd have thought this culinary staple would create such magic?  We let ours dry for about 40 minutes (more might be necessary depending on the wetness of the piece) and then carefully removed the tape and salt.  Lastly, while we did not, one might then choose to hand paint embellishments on the trees or wherever desired.

In Tamara's piece, as well as in those we created, I thought the crystalline forms looked more like leaves than snow or stars so we tried out some alternate compositions with this in mind.


The most difficult portion of this project was tearing the tape.  When my six year old wanted to do one of her own then, she skipped the trees and just went for cutting a moon to stick in a beautiful night sky.  (Hers is the one in the middle above.)

With this one, I thought it might be interesting to make the "leaves" yellow and so painted an under layer and let it dry prior to adding the final paint and salt.


It needs a little tweaking, but I still love the idea and the possibilities of a tree or alternate scene for each season.  We were using coarse grain salt on these.  I'm wondering what a finer sprinkling might do, especially for the star effect?


Spoiler Alert:  If you're on my Christmas card list, a certain element of surprise in our holiday greetings may now be lacking.

Thursday, October 11, 2012

fruit loop

We try to make it most years to the Fruit Loop out by Hood River in the Columbia River Gorge.  It's another of our days of wholesome family fun on a 35-mile, scenic drive through a valley of orchards, forests, farmlands, and friendly communities. We stop at a few farms to sample delicious fruits and take our favorites home and also take part in some of the fun family activities hosted at Fruit Loop locations.
Our favorite stop is Rasmussen's where Naiya always loves the corn maze and gets a kick out of Pumpkin Funland.  This year it had a London Olympics theme.
 

a little goofy...

...but a lot of fun.


Our second stop was a new one this year. At Draper Girls Country Farm we got some delicious apples to add to the tasty pears we had picked up at Rasmussen and enjoyed the goats, the swing and a walk through the cornfield and orchards.


Our last stop on the Loop was also an old favorite because of the grand fort/castle structure that we so enjoy there.  Kiyokawa Family Orchards also has a delicious and extensive apple and pear selection. 


A few years ago we had taken this ridiculous photo of Ryan and Naiya playing in the super cool castle. 

Sometimes I have a strange wish to recreate goofy moments so I made them pose there again this time around. 

 It was an absolutely gorgeous day and, I'm not exactly sure why, but it was also one of the best family outings we have ever had.


Tuesday, October 9, 2012

harvest festival

The Autumn Harvest has long been a time to celebrate the plenty and hard work of the seasons just past. Traditionally ample food was available at this time of year and farming folk began to be freed up from long, hard working days.  In our lives, the bustle of the start of the school year, the backyard gardening and the girl-child's birthday have passed and we have a moment of pause before the holiday season begins.  

The weather is changing and the light is beginning to fade even as we hold on to the last days of sunshine and short sleeves.  It's the time of year when gratitude comes easily and many seem to feel genuinely thankful for all the goodness in our lives. 

We celebrate these internal and external changes with our Waldorf school community at the annual Harvest Festival.  It's a day of family fun that includes singing, square dancing, a puppet show, music, crafts and a community potluck.

Families bring the fruits and seeds of their home harvests for exchange and the children enjoy the simple activities and rambunctious outdoor play on the beautiful grounds.


We picked up a copy of the new community cookbook, carved our Halloween Jack-o-Lantern, made corn dolls and pumpkin necklaces and even got in a bit of square dancing after lunch.


Another lovely festival and traditional gathering to carry us into the coming season.

Golden light is turning grey,
Mists begin to rule the day.
Bare the trees, their branches lift;
Clouds of dead leaves earthward drift.
Through the field the farmer goes,
Seeds of ripened corn he sows
Trusts the earth will hold it warm,
Shelter it from cold and harm.
For he knows that warmth and light
Live there, hidden from our sight;
And beneath a sheltering wing,
Deep below, new life will spring!

Tuesday, October 2, 2012

this year's birthday treasure hunt

As in year's past, for Naiya's birthday we hosted a gathering at Kruger's Farm on Sauvie Island.  Once again we put together a little treasure hunt with some natural, hand made gifts for all the wee ones.  Some Waldorf friends of mine occasionally ask about ideas for natural party favors, so I thought I'd share this year's collection.


We began with a basket full of gathering bags made from twill tape and scraps of felted sweaters.  The children were able to fill the bags with treasures along the way and then take them home to use and fill with all manner of leaves, pine cones, stones and whatnot on their seasonal nature walks.
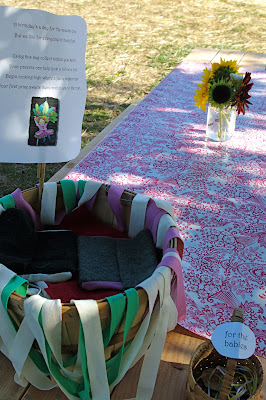
A birthday’s a day for the special one
But we like for everyone to have fun!
Using this bag collect riches you spot
Your parents can help (just a bit or a lot)
Begin looking high where a fairie might rest
Your first prize awaits there and clues to the rest...


 The felt piece measured about 6" x 18" and was stitched onto a 3' length of twill tape leaving a few inches to be folded over for a flap.  I had thought of them as gathering bags but with quite a few left at the end of our party, I fear some of the boys may have seen them more as "purses" and opted to carry their treasures in their pockets instead.


In a tree nearby, the children found their second item and a fairie offering a clue to the next.
We hope you can find your own name in this tree
Right after this there are more things to see
A gnome watches over a tiny collection
of critters to share - find and make your selection


The idea for these name tag pendants came from those worn by some children I spied at summer camps in the wild parks of Portland.  The wood rounds were cut from a branch of a hazelnut tree that our neighbor had left on the curb for firewood and we wrote the names with a wood burner pen.  


The tree fairie lead the adventurers to our garden gnome who overlooked a field of sweet critters.
Into your pouch one sweet critter will go
Which one you’ll chose, only you know
Next look for pixies who seldom we spy
Perhaps their small village is somewhere nearby


With so many children in attendance this year, I cheated a bit and purchased one of the prizes.  We found these little glass critters at Audubon Society of Portland's Nature Store.


After tarrying a bit with our gnome and selecting a critter, the children were led to a pixie village.  The pixies (as is often the case) were not to be found, but they left their little homes for the kids to have as their own.
The pixies away by the wind have been blown
But they’ve left you their houses to have for your own
Tuck one into your bag now, then run off and play
We ‘re so happy you joined us for this special day


These are surprisingly simple and quick to make.  They're formed out of Super Sculpey and baked in the oven for half an hour.  I painted them with water colors and I think this gives them a nice translucent, magical quality.  The downside is that the watercolors will just wash off if they get wet.  I figured that made them, in the long run, a more interactive play thing... the children could repaint them themselves!
Related Posts Plugin for WordPress, Blogger...